Skip to content

Lily Pad Square

Project Details

Easy/Intermediate

This pattern is written in US Crochet Terminology and uses standard Crochet Abbreviations.

Description

  • Chain 4 stitches, and join into a circle. Chain 3, then work 11 dc into the round; join with a slip stitch to top of ch 3 and fasten off. (12 stitches)
  • Now can you see that the top of the stitches are made up of loops; we usually work under both loops, but you can work under just the front loops, or just under the back loops.
  • In order to make this project we are going to work a round in the front loops, and a second, separate round in the back loops….
  • So, connect your second colour into one of the back loops with a sl st, and ch 3, REMEMBER YOU ARE WORKING ONLY IN THE BACK LOOPS OF THE STITCHES IN THIS ROUND; dc in the same st, *2dc in next stitch, rep from * 10 more times. Sl st into top of ch 3. (24 dc)
  • Now we are going to make the outer bobbles – ON THIS ROUND WE ARE WORKING ONLY IN THE FRONT LOOPS OF THE STITCHES. Ch 4. Now work 4 tr into the front of the next st. Pull up the loop and drop from your hook
  • Push your hook from front to back into the first treble worked.
  • Now also catch the dropped loop onto your hook.
  • Holding the yarn tight, pull the loop through the 1st treble to form a bobble. 1 bobble made…!
  • ch4 and join to the front loop of the next st with a sl st.
  • Ch 4; make next bobble in front loop of next stitch. Continue like this until 12 bobbles have been made, finishing with ch 4 and sl st into bottom of first ch 4. Fasten off.

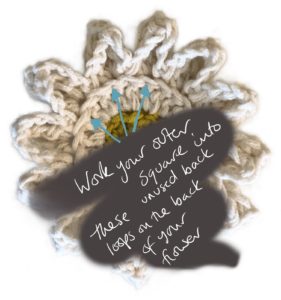
Note that as we worked into only the back stitches of the first round we still have the front stitches to work in – we’ll be doing that next. On the back view un-worked back loops can clearly be seen at the base of the bobbles – we’ll come back to them.

  • Ok, lets put the inner row of bobbles in. Insert your hook into one of the front loops of round 1, and join your chosen colour with a sl st. 
  • *Ch 4, 4 tr in next st, drop loop, insert hook into top of 1st tr, catch dropped loop and pull through to form bobble, ch 4, join with sl st to next st; rep from * 5 more times. (this is all a repeat of what we did on the previous row, only you’re making 6 bobbles this time not 12). Fasten off.

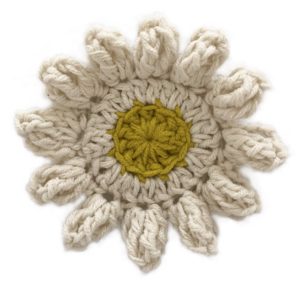
Now this could be your tadaaa! moment if you wish, pop a pin on the back and make a brooch, or sew to embellish a bag or cushion.

  • But to make into a square; join yarn into one of the back loops at the back of work, under the bobbles. (remember I said we would come back to them).  Work with the front of the flower facing you and pull the bobble down to see the loop behind.

Ch 3, dc in same st, dc in next st, *2dc in next st, 1 dc; rep from * 10 times more. Join with a sl st into top of ch 3. (36 dc) 

  • Plain sailing now, we are back to working under both loops. *[tr1, ch 2, tr1], 1dc, 2hdc, 2sc, 2hdc, 1dc; rep. from * 3 more times. Join with a sl st into top of 1st tr and sl st into corner space.
  • *[sc, hdc, ch2, hdc, sc] in corner space, sc in each st across to next corner, rep from * 3 more times.  Sl st into 1st sc,  fasten off and weave in ends.    

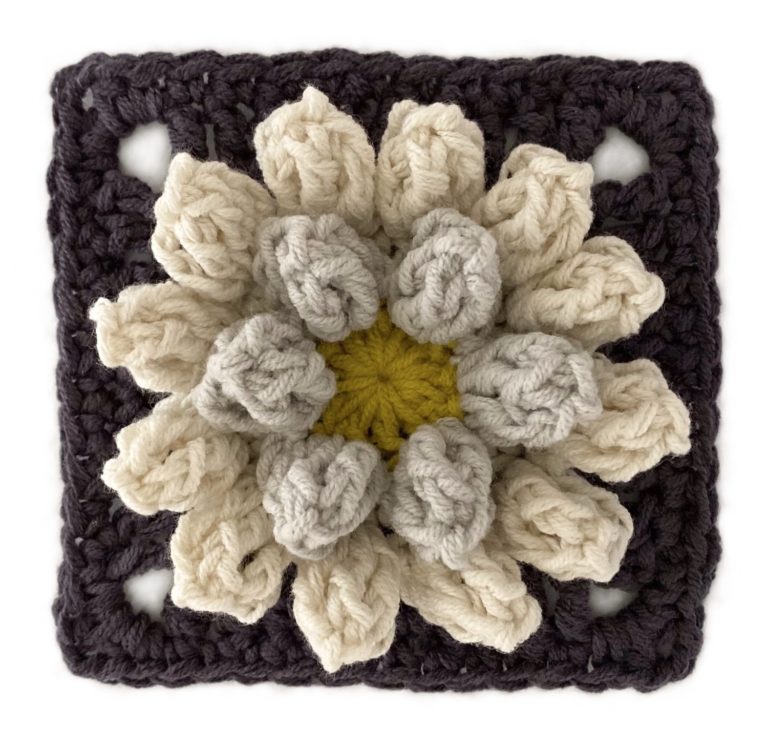
And there you go,  one Lily Pad Square x